

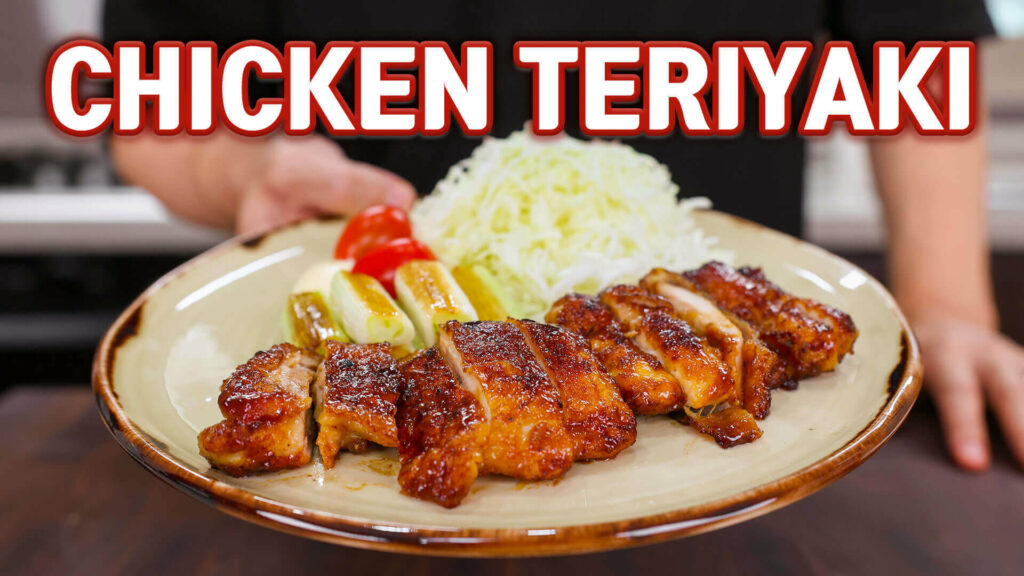
Chicken Teriyaki is not a thing that only restaurants can make. It’s way easier than you think, so you can do it! And if you do, I’m sure you will taste the best chicken teriyaki that you’ve ever had. I guarantee it!
TERIYAKI SAUCE
Ingredients:
- 3-4 green onions (preferably white part)
- 1/4 yellow onion
- 4 cloves garlic
- 0.4 oz (10g) ginger
Teriyaki Sauce:
Instructions:
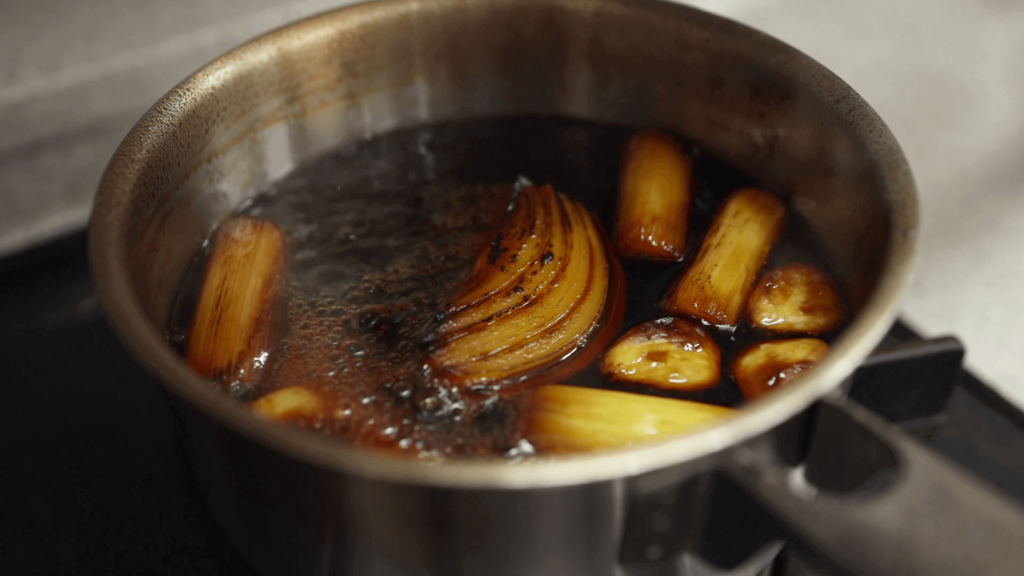
1. Roughly chop the green onions. Cut the onion into quarters. Place them on a baking sheet lined with foil. Add the garlic cloves and ginger. Place them under the broiler for 10 minutes or until nice and charred. (If you don’t have a broiler, you can cook them in a dry pan.)
2. Meanwhile, in a saucepan, combine the soy sauce, mirin, sake, and sugar. Add the charred vegetables. Bring it to a boil. Once it comes to a boil, reduce the heat to low heat. Simmer for 10 more minutes, stirring occasionally.
3. Once the sauce is reduced by 2/3, remove it from the heat. Set aside.
NOTES:
- Once completely cooled, you can transfer it into a jar and keep it in the fridge for up to 3 months.
- There’s so much you can do with this teriyaki sauce, so try it with various proteins and veggies!
CHICKEN TERIYAKI (1 serving)
Ingredients:
- 2 green onions
- 1 cup green cabbage
- 1-2 boneless, skin-on chicken thighs (or breasts)
- Kosher salt and black pepper, to season
- Potato starch (or cornstarch, cake flour)
- 1/2 tbsp neutral-tasting oil (such as canola, grapeseed, vegetable oil, etc.)
- Homemade teriyaki sauce
- Kewpie mayo
- 1 cherry tomato (optional), to garnish
Instructions:
PREP INGREDIENTS
1. Cut the green onions into long strips.
2. Thinly slice the cabbage. Soak them in cold water.
3. Prepare the chicken: Trim off any excess fat but leave the skin-on. Season both sides with salt and pepper. Coat them with some potato starch (or cake flour). Shake off the excess.
COOK CHICKEN TERIYAKI
1. In a pan, heat the oil over medium-low heat. Once it gets nice and hot, place the chicken, skin side down, and the green onions. Once the green onions are nice and charred, remove them from the pan.
2. Once you’ve got good color on one side, flip and cook the other side for another couple of minutes.
3. Once the chicken is golden and crispy on both sides, reduce the heat to low. Generously brush them with teriyaki sauce. (Don’t forget to coat the outside with the sauce in the pan.) Let rest before slicing.
4. To serve, place the drained cabbage on a plate. Add some kewpie mayo, tomato, and grilled green onions. Drizzle some of that teriyaki sauce over the cabbage. Place the teriyaki chicken on the other side. Serve it with hot rice. Enjoy~!
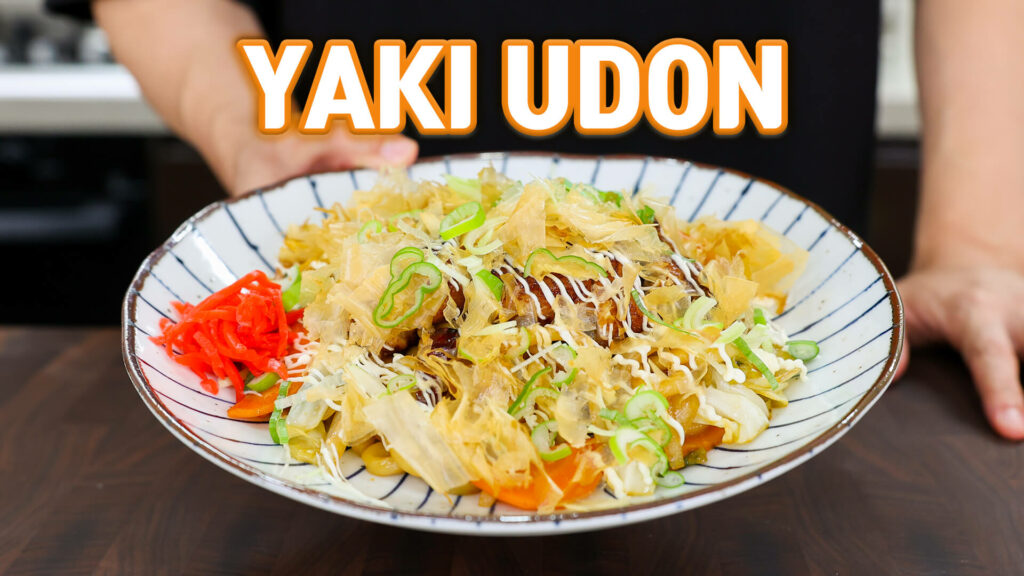
Yaki Udon (1 serving)
Ingredients:
- 1/4 yellow onion
- 1 green onion
- 1 cup green cabbage (or baby bak choy, napa cabbage)
- 0.8 oz (25g) carrot
- 1 udon noodles
- 1 tbsp neutral-tasting oil (such as canola, grapeseed, vegetable oil, etc.)
- 2-3 Vietnamese dried chilies (optional)
Sauce:
- 2 tbsp homemade teriyaki sauce
- 1 tbsp oyster sauce (optional)
To serve (optional):
- 1 teriyaki chicken
- Kewpie mayo
- Dried bonito flakes
- Green onion
- Japanese pickled ginger (beni shoga)
Instructions:
1. Slice the onion, not too thin, not too thick. Thinly slice the green onion. Cut the cabbage and carrot into bite-sized pieces.
2. Mix the homemade teriyaki sauce and oyster sauce (if using) in a small bowl.
3. Cook the noodles according to the package instructions. Drain the noodles.
4. In a pan, heat the oil over medium heat. Once it gets nice and hot, add the green onion and dried chilies (if using). Saute for 1 minute or until fragrant.
5. Increase the heat to high. Add the vegetables. Once the vegetables are halfway cooked, add the drained noodles and the sauce. Stir-fry it for 2 minutes or until evenly coated.
6. Transfer to a serving plate. On top of the noodles, place the teriyaki chicken. Top with kewpie mayo, dried bonito flakes, green onion, and Japanese pickled ginger. Enjoy~!
WATCH FULL VIDEO

Ingredients
1-2 boneless, skin-on chicken thighs (or breasts)
Kosher salt and black pepper, to season
Potato starch (or cornstarch, cake flour)
1/2 tbsp neutral-tasting oil (such as canola, vegetable oil, etc.)
2 green onions, to serve
1 cup green cabbage, to serve
Kewpie mayo, to drizzle
1 cherry tomato (optional), to serve
- Teriyaki Sauce:
3-4 green onions (preferably white part)
1/4 yellow onion
4 cloves garlic
0.4 oz (10g) ginger
1 cup (240ml) soy sauce
1 cup (240ml) mirin
1/2 cup (120ml) sake (or cooking sake)
1/2 cup (120ml) sugar
Directions
- Make Teriyaki Sauce
- Roughly chop the green onions. Place the green onions, onion, garlic, and ginger on a baking sheet lined with foil. Place them under the broiler for 10 minutes or until nice and charred. (If you don’t have a broiler, you can cook them in a dry pan.)
- In a saucepan, combine the soy sauce, mirin, sake, and sugar. Add the charred vegetables. Bring it to a boil. Once it comes to a boil, reduce the heat to low. Simmer for 10 more minutes, stirring occasionally.
- Once the sauce is reduced by 2/3, remove it from the heat. Set aside.
- Make Chicken Teriyaki
- Cut the green onions into long strips. Thinly slice the cabbage. Soak them in cold water.
- Prepare the chicken: Trim off any excess fat, but leave the skin on. Season both sides with salt and pepper. Coat them with some potato starch and shake off the excess.
- In a pan, heat the oil over medium-low heat. Once it gets nice and hot, place the chicken, skin side down, and the green onions. Once the green onions are nice and charred, remove them from the pan.
- Once you’ve got good color on one side, flip and cook the other side for another couple of minutes. Once the chicken is golden and crispy on both sides, reduce the heat to low. Generously brush them with teriyaki sauce. (Don’t forget to coat the outside with the sauce in the pan.) Remove them from the heat and let rest before slicing.
- To serve, place the drained cabbage on a plate. Add some kewpie mayo, tomato, and grilled green onions. Drizzle some of that teriyaki sauce over the cabbage. Place the teriyaki chicken on the other side. Serve it with hot rice. Enjoy~!
Notes
- 1 Tbsp = 15 ml, 1 Cup = 240 ml
- There’s so much you can do with this teriyaki sauce, so try it with various proteins and veggies.
9 Comments
Aaron and Claire, thank you for another dish filled with flavor and memories!
My adoptive Chinese “grandmother” made a very similar teriyaki sauce, where she grilled the aromatics while heating up the charcoal brazier for a hibachi style meal. Hibachi on Sunday, and teriyaki always followed later in the week.
My pleasure! I hope you enjoy it and thank you for sharing your cherished memories with us! 🥰
Hi Aaron, when coating the chicken thighs with the sauce, do you also coat the under side too?
Yes, coat both sides with the teriyaki sauce! 😊
Can you link those bottles you use for the teriyaki sauce?
Hi Aaron! Thank you so much for posting this recipe! I was just wondering what would you add to make it spicy since I like to have my sauce a bit spicy, would you add chili peppers while simmering or would you do something else? Also, how much teriyaki sauce does this make? Thanks!:)
Yes, if I want to make it spicy, I would add some dried chilies while simmering. But if you already made the sauce, I suggest adding some dried chilies while grilling the chicken. Hope this helps!
Hi, don’t know if anyone will see this as it’s 2023… This looks really delicious and I plan on making it. (And I adore your Youtube videos!)
But I was hoping for clarification about “Once the sauce is reduced by 2/3” – does this mean I wait until have only 1/3 of the original volume?
That is, if I started with 3 total cups of liquid, would I boil/simmer until I have only 1 cup… or 2?
Thank you!
Joshua
Hey,sorry to make you feel confused. What I meant is that, if you start with 3 total cups of liquid, you boil/simmer it until you have 2 cups. The final sauce might look quite liquidy, but don’t worry about it! It’ll thicken more as it cooks in the pan. Hope this could be a good answer! 🙂